前言 本文会从零开始介绍retrofit的一些简单使用和封装,基于retrofit:2.3.0
一、初识retrofit 1.retrofit是什么? retrofit官方文档的介绍非常的简洁明了,俗话说得好,字越少越牛逼,它是一个适用于Android和Java的类型安全HTTP客户端,它的底层是基于okhttp的,用了各种各样的设计模式封装起来的,在这里我们不多赘述,至于也不了解okhttp的,emmm,懂的都懂
2.一些配置和数据准备
既然是用于通信的,就不要忘记添加网络权限,在项目的Androidmanifest中添加
1
2
<!-- 访问网络的权限 --> <uses-permission android:name="android.permission.INTERNET" ></uses-permission>
当然也少不了添加依赖,为了不过多赘述这些,我们一次添加齐全,在build.gradle中添加
1 2 3 4 5 6 7 api 'com.squareup.retrofit2:retrofit:2.3.0' api 'com.squareup.retrofit2:converter-gson:2.3.0' api 'com.squareup.retrofit2:adapter-rxjava2:2.3.0' api 'com.trello.rxlifecycle2:rxlifecycle-components:2.2.1' api 'com.facebook.stetho:stetho:1.5.0' api 'com.facebook.stetho:stetho-okhttp3:1.5.0'
我们来一个请求的返回体
1
2
3
4
5
6
7
8
9
10
11
12
13
14
15
16
17
18
19
20
21
22
23
24
25
26
27
28
29
30
31
32
33
34
35
36
37
38
39
40
41
42
43
44
45
46
47
48
49
50
51
52
53
54
55
56
57
58
59
60
61
62
63
64
65
66
67
68
69
70
71
72
73
74
75
76
77
78
79
80
81
82
83
84
85
86
87
88
89
90
91
92
93
94
95
96
97
98
99
100
101
102
103
104
105
106
107
108
109
110
111
112
113
114
115
116
117
118
119
120
121
122
123
124
125
126
127
128
129
130
131
132
133
134
135
136
137
138
139
140
141
import io.swagger.annotations.ApiModel;import io.swagger.annotations.ApiModelProperty;import java.io.Serializable;import java.util.HashMap;import java.util.Map;@ApiModel( value = "DataResponse", description = "请求返回值" ) public abstract class DataResponse <T> implements Serializable { private static final long serialVersionUID = -7574544066074667453L ; @ApiModelProperty( value = "错误编码,0代表无错误", name = "errorCode" ) private int errorCode = 0 ; @ApiModelProperty( value = "结果编码", name = "resultCode" ) private String resultCode = "" ; @ApiModelProperty( value = "结果信息", name = "message" ) private String message; @ApiModelProperty( value = "附加信息", name = "extInfo" ) private Map<String, Object> extInfo = new HashMap (); @ApiModelProperty( value = "请求返回数据", name = "data" ) private T data; private String requestId; public DataResponse () { } public DataResponse (T data) { this .data = data; } public DataResponse (T data, int errorCode) { this .data = data; this .errorCode = errorCode; } public int getErrorCode () { return this .errorCode; } public void setErrorCode (int errorCode) { this .errorCode = errorCode; } public T getData () { return this .data; } public void setData (T data) { this .data = data; } public String getMessage () { return this .message; } public void setMessage (String message) { this .message = message; } public Map<String, Object> getExtInfo () { return this .extInfo; } public void setExtInfo (Map<String, Object> extInfo) { this .extInfo = extInfo; } public String getResultCode () { return this .resultCode; } public void setResultCode (String resultCode) { this .resultCode = resultCode; } public boolean isError () { return this .errorCode != 0 ; } public String getRequestId () { return this .requestId; } public void setRequestId (String requestId) { this .requestId = requestId; } public String toString () { StringBuilder builder = new StringBuilder (); builder.append("DataResponse [errorCode=" ); builder.append(this .errorCode); builder.append(", " ); if (this .resultCode != null ) { builder.append("resultCode=" ); builder.append(this .resultCode); builder.append(", " ); } if (this .message != null ) { builder.append("message=" ); builder.append(this .message); builder.append(", " ); } if (this .extInfo != null ) { builder.append("extInfo=" ); builder.append(this .extInfo); builder.append(", " ); } if (this .data != null ) { builder.append("data=" ); builder.append(this .data); builder.append(", " ); } if (this .requestId != null ) { builder.append("requestId=" ); builder.append(this .requestId); } builder.append("]" ); return builder.toString(); } }
自然我们也需要个请求头
1
2
3
4
5
6
7
8
9
10
11
12
13
14
15
16
17
18
19
20
21
22
23
24
25
26
27
28
29
30
31
32
33
34
35
36
37
38
39
40
41
42
43
44
45
46
47
48
49
50
51
52
53
54
55
56
57
58
59
60
61
62
63
64
65
66
67
68
69
70
71
72
73
74
75
76
77
78
79
80
81
82
83
84
85
86
87
88
89
90
91
92
93
94
95
96
97
98
99
100
101
102
103
104
105
106
107
108
109
110
111
112
113
114
115
116
import io.swagger.annotations.ApiModel;import io.swagger.annotations.ApiModelProperty;import java.io.Serializable;import java.util.Date;import java.util.HashMap;import java.util.Map;@ApiModel( value = "DataRequest", description = "请求" ) public abstract class DataRequest <T> implements Serializable { private static final long serialVersionUID = -7574544066074667453L ; @ApiModelProperty( value = "请求数据", name = "data" ) private T data; @ApiModelProperty( value = "附加信息", name = "extInfo" ) private Map<String, String> extInfo = new HashMap (); @ApiModelProperty( value = "附加动作", name = "action" ) private String action; private String username; private String requestId; private Date requestTime; private String security; public DataRequest () { } public T getData () { return this .data; } public void setData (T data) { this .data = data; } public Map<String, String> getExtInfo () { return this .extInfo; } public void setExtInfo (Map<String, String> extInfo) { this .extInfo = extInfo; } public String getAction () { return this .action; } public void setAction (String action) { this .action = action; } public String toString () { StringBuilder builder = new StringBuilder (); builder.append("DataRequest [" ); if (this .data != null ) { builder.append("data=" ); builder.append(this .data); builder.append(", " ); } if (this .extInfo != null ) { builder.append("extInfo=" ); builder.append(this .extInfo); builder.append(", " ); } if (this .action != null ) { builder.append("action=" ); builder.append(this .action); } builder.append("]" ); return builder.toString(); } public String getUsername () { return this .username; } public void setUsername (String username) { this .username = username; } public String getSecurity () { return this .security; } public void setSecurity (String security) { this .security = security; } public String getRequestId () { return this .requestId; } public void setRequestId (String requestId) { this .requestId = requestId; } public Date getRequestTime () { return this .requestTime; } public void setRequestTime (Date requestTime) { this .requestTime = requestTime; } }
3.快速上手retrofit 如果你学习过springboot,那么你对接下来这一套不要太熟悉,我们先来一个最简单的不带参get请求熟悉一下
a.接口 首先我们来一个Retrofit标准的接口
1
2
3
4
public interface ITestService { @GET("/test") Call<DefaultResponse<Object>> get () ; }
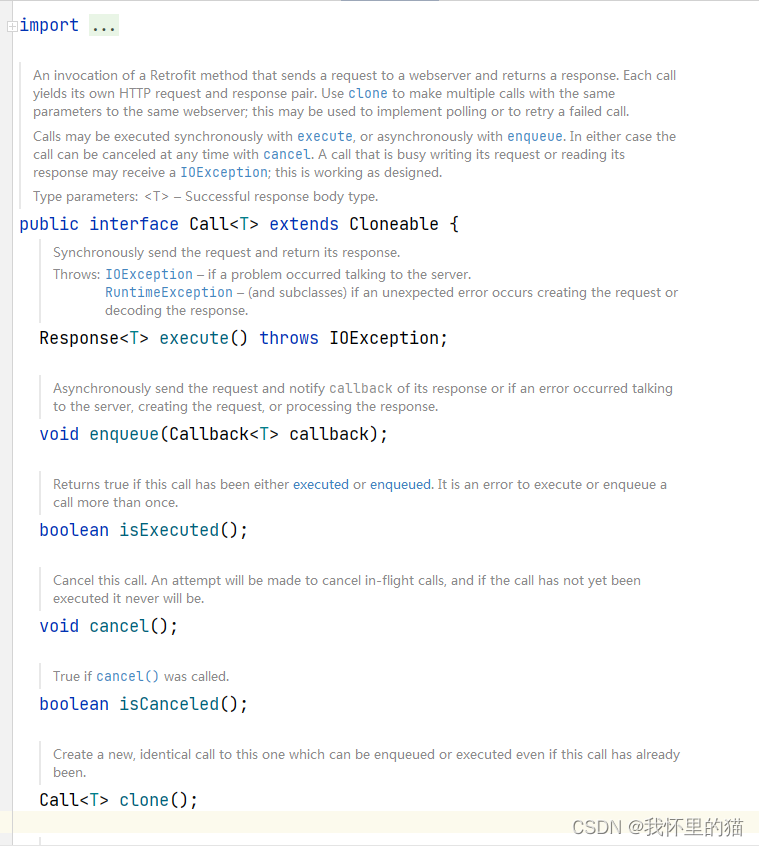
其中“/test” DefaultResponse @GET Call方法 callback),稍后我们会有示例
1 2 3 4 5 6 7 8 Response<T> execute () throws IOException; void enqueue (Callback<T> callback) ; void cancel () ; Call<T> clone () ;
call接口的实现在源码的OkHttpCall中,这说明retrofit确实是基于OkHttp的,我们以execute()为例
1
2
3
4
5
6
7
8
9
10
11
12
13
14
15
16
17
18
19
20
21
22
23
24
25
26
27
28
29
30
31
32
@Override public Response<T> execute () throws IOException { okhttp3.Call call; synchronized (this ) { if (executed) throw new IllegalStateException ("Already executed." ); executed = true ; if (creationFailure != null ) { if (creationFailure instanceof IOException) { throw (IOException) creationFailure; } else { throw (RuntimeException) creationFailure; } } call = rawCall; if (call == null ) { try { call = rawCall = createRawCall(); } catch (IOException | RuntimeException e) { creationFailure = e; throw e; } } } if (canceled) { call.cancel(); } return parseResponse(call.execute()); }
至于为什么同步方法要抛异常,这是因为同步请求可能忙于写请求或读取响应的呼叫,这时就会抛出异常
b.实现 然后我们实现我们写的ITestService 接口,当然,这也是最简单的方式,并且这和springboot有一些区别
1 2 3 4 5 6 7 String url = "xxxxxxxxx" Retrofit retrofit = new Retrofit .Builder() .baseUrl(url) .build(); ITestService service = retrofit.create(ITestService .class);
c.execute()和enqueue(Callback callback) 最后我们来调用我们写的第一个接口,前面说了,有两种方式
1
2
3
4
5
6
7
8
9
10
11
12
13
14
15
16
17
18
19
20
21
22
23
24
25
Call<DefaultResponse<Object>> responseCall = service .get() try { Response<DefaultResponse<Object>> responseResponse = responseCall.execute(); if (responseResponse.isSuccessful()){ DefaultResponse<Object> response = responseResponse.body(); } }catch (IOException e) { e.printStackTrace(); } responseCall.enqueue(new Callback <DefaultResponse<Object>>() { @Override public void onResponse (Call<DefaultResponse<Object>> call, Response<DefaultResponse<Object>> response) { } @Override public void onFailure (Call<DefaultResponse<Object>> call, Throwable t) { } });
这样,我们就能拿到后台接口的返回,这只是帮助你理解retrofit的模式,接下来,我们来深入了解一下其他的用法。
二、更多用法(注解介绍) 之前我们展示了最简单的Get请求,并了解到可以使用@GET注解
1.八种请求注解
注解
作用
@GET
get请求
@POST
post请求
@PUT
put请求
@DELETE
delete请求
@OPTIONS
OPTIONS请求
@PATCH
PATCH请求
@HEAD
HEAD请求
@HTTP
是上面注解的总和,可以实现上面所有请求,并可以拓展
下面是代码一些代码示例:
@GET
1 2 3 4 @GET("/test") Call<DefaultResponse<Object>> get (@Query("id") String id) ;
@POST
1 2 3 @POST("/test") Call<DefaultResponse<Object>> post (@Body DataRequest request ) ;
@PUT
1
2
@PUT("/test") Call<DefaultResponse<Object>> put (@Body DataRequest request ) ;
@DELETE
1
2
@DELETE("/test") Call<DefaultResponse<Object>> delete (@Body DataRequest request ) ;
@HTTP
1 2 3 4 5 6 7 8 9 @HTTP(method = "GET", path = "blog/{id}", hasBody = false) Call<DefaultResponse<Object>> gethttp (@Path("id") int id) ;
@OPTIONS与 @PATCH由于篇幅原因不多做示例
2.四种标记注解
注解
作用
@Headers
使用 @Headers 注解设置固定的请求头,所有请求头不会相互覆盖,即使名字相同。
@FormUrlEncoded
表示发送form-encoded的数据,每个键值对需要用@Filed来注解键名,随后的对象需要提供值。
@Multipart
表示发送form-encoded的数据(适用于 有文件 上传的场景),每个键值对需要用@Part来注解键名,随后的对象需要提供值。
@Streaming
表示返回的数据将以流来返回,默认是载入内存的
注解太多了,下面的代码示例为官网示例
@Headers
1
2
3
4
5
6
7
@Headers("Cache-Control: max-age=640000") @GET("widget/list") Call<List<Widget>> widgetList () ; @Headers({ "Accept: application/vnd.github.v3.full+json", "User-Agent: Retrofit-Sample-App" })
@FormUrlEncoded
1
2
3
@FormUrlEncoded @POST("user/edit") Call<User> updateUser (@Field("first_name") String first, @Field("last_name") String last) ;
@Multipart
1
2
3
@Multipart @PUT("user/photo") Call<User> updateUser (@Part("photo") RequestBody photo, @Part("description") RequestBody description) ;
@Streaming由于篇幅原因不多做示例
3.十二个参数注解
@Url
注解
作用
@Path
接收一个字符串表示接口 path ,与 baseUrl 组成完整的 Url
@Path
1
2
@GET("users/{username}") Call<User> getUser (@Path("username") String username) ;
三、进阶使用 在初识retrofit中,我们了解了retrofit的基本构造方法和使用,但如果要实际运用到项目当中,那么简单的使用方法还不够,因为在实际项目中不可能每一个请求都像我们开始那样写一遍,所以我们要自己封装更好的
1.RetrofitService 这是我们一开始的使用方法,url一般是不会变的
1 2 3 4 5 String url = "xxxxxxxxx" Retrofit retrofit = new Retrofit .Builder() .baseUrl(url) .build();
正如前言,这太low了,你拿这个跟别人说你会retrofit,大佬们看到了都会笑的,就像这样
所以我们需要
RetrofitService 让我们基于之前的代码加上一点点的改动
1
2
3
4
5
6
7
8
9
10
11
12
13
14
15
16
17
18
19
20
21
22
23
24
25
26
27
28
29
30
31
public class RetrofitService { private static RetrofitService i; private Retrofit retrofit; private String url = "xxxxxxxxx" public static RetrofitService i () { if (i == null ) { i = new RetrofitService (); } return i; } private RetrofitService () { try { retrofit = new Retrofit .Builder() .baseUrl(url) .build(); }catch (Exception e){ Log.e("RetrofitService" , "RetrofitService: " +url+" ExceptionMessage: " +e.getMessage()); } } public <T> T create (Class<T> clazz) { return retrofit.create(clazz); } } ITestService api = RetrofitService.i().create(ITestService .class);
2.ConverterFactory 只有一个单例模式的RetrofitService还远远不够,我们再在基础的构造方法中加一个全局的date类型转换,我们以Jackson为例,改动RetrofitService()方法
1
2
3
4
5
6
7
8
9
10
11
12
13
14
private RetrofitService () { try { ObjectMapper objectMapper = new ObjectMapper (); objectMapper.disable(DeserializationFeature.FAIL_ON_UNKNOWN_PROPERTIES); JacksonConverterFactory jacksonConverterFactory = JacksonConverterFactory.create(objectMapper); retrofit = new Retrofit .Builder() .baseUrl(url) .addConverterFactory(jacksonConverterFactory) .build(); }catch (Exception e){ Log.e("RetrofitService" , "RetrofitService: " +url+" ExceptionMessage: " +e.getMessage()); } }
3.OkHttpClient 有了类型转换,又怎么能没有超时时间和intercept呢?,这里使用了OkHttpClient,我们在RetrofitService中加入了如下改动
1
2
3
4
5
6
7
8
9
10
11
12
13
14
15
16
17
18
19
20
21
22
23
24
25
26
27
28
29
30
31
32
33
34
35
36
37
38
39
40
41
42
private static final OkHttpClient client = new OkHttpClient .Builder() .connectTimeout(30 , TimeUnit.SECONDS) .readTimeout(30 , TimeUnit.SECONDS) .sslSocketFactory(HttpsUtils.getSslSocketFactory(null ,null ,null )) .hostnameVerifier(new HostnameVerifier () { @Override public boolean verify (String hostname, SSLSession session) { return true ; } }) .writeTimeout(30 , TimeUnit.SECONDS).addInterceptor(new Interceptor () { @Override public Response intercept (Chain chain) throws IOException { Request.Builder builder = chain.request() .newBuilder(); builder.addHeader("token" , 111222333 ); Request request = builder.build(); return chain.proceed(request); } }).build(); private RetrofitService () { try { ObjectMapper objectMapper = new ObjectMapper (); objectMapper.disable(DeserializationFeature.FAIL_ON_UNKNOWN_PROPERTIES); JacksonConverterFactory jacksonConverterFactory = JacksonConverterFactory.create(objectMapper); retrofit = new Retrofit .Builder() .baseUrl(url) .client(client) .addConverterFactory(jacksonConverterFactory) .build(); }catch (Exception e){ Log.e("RetrofitService" , "RetrofitService: " +url+" ExceptionMessage: " +e.getMessage()); } }
至此,一个Retrofit工具类完成,如果你需要更多功能可以阅读Retrofit.java的源码